Wednesday, December 28, 2011

Ridiculously Easy Recipe: Blue Cheese and Chive Steak Butter

My husband turned 26 this month and for his birthday I made bacon-wrapped steaks and macaroni and cheese for his special dinner. I’m a sentimentalist, and I can’t help thinking about the very first meal I made for him, back in the summer of 2004.

It was the weekend before he moved away to college, and my wonderful older sister offered us her apartment (She even bought us the beer to use as a base for the cheese). I made grilled steak strips and cheese fondue in one of those fondue pots with the little Sterno cans people used to give to one another at Christmas. By the end of the meal, the cheese was burnt to the bottom, but my, it was delicious! Years later, I realized that wasn’t exactly how fondue is done, but Jeff appreciated my efforts to woo him with food.

The steaks were a little pricier than I would normally buy, but it was a special occasion and still less expensive and more special than if we had gone to a local steak house. They were pre-bacon wrapped, seasoned with salt, pepper, and garlic, then quickly seared in butter on the stove top, and finished in a 400-degree oven to a perfect medium-rare for ten to fifteen minutes.

What really made these steaks pop was the blue cheese and chive butter I prepared in the morning. Creamy gorgonzola cheese with tangy chives is the perfect complement to the savory, rich taste of these steaks.

Spoiler alert! You will need at least 2 hours (prep plus chill time) to prepare this recipe!

Plan accordingly.

Blue Cheese and Chive Steak Butter

Makes (roughly) 12 servings

½ cup or 1 stick salted cream butter, softend

¼ cup gorgonzola, or other blue cheese

2 cloves garlic, very finely chopped or 2 tsp garlic powder

2 tbsp chopped chives

Sprinkle kosher salt

Ground pepper

1. In a small bowl or food processor, combine all ingredients but chives and mix until well blended and most of the blue cheese chunks are smoothed out. Stir in the chives last.

2. Spread butter into plastic wrap or parchment paper and twist into a log shape- about 6” long. Twist and seal the ends, then refrigerate for 2 hours or until set.

3. To serve, remove from the fridge and cut into ½ inch coins. Float on top of fresh-cooked steaks. The residual heat from the meat will melt the butter. Use one coin per 4 ounces of steak, or to your taste (we love butter!)

4. Re-wrap and use within a week, or freeze for up to a month.

Questions? Comment below!

XOXO

Shauna E!

Quick and Dirty Q&A

Q. I can’t find blue cheese or chives/ I don’t like blue cheese or chives. Any other suggestions?

A. If you aren’t a fan of blue cheese or onions, there are many other variations you could do. Try adding prepared horseradish and bacon bits (stir in at the end as if they were chives). Sundried tomatoes and parmesan cheese would be another great flavor combination. Replace the chives for parsley, dill, or rosemary. Replace the blue cheese with feta or finely shredded cheddar. The trick is to add each ingredient slowly and taste occasionally until you find a ratio that works for you.

Q. I don’t eat steak, but this butter sounds delicious. Any other uses for it?

A. Tons! You could use this butter to finish off grilled veggies, fish, chicken, or even pork. Replace it for normal butter (1-to-1) in recipes for pasta or rice. If you do choose to use it as a replacement, make sure you omit or adjust any garlic or salt so you don’t over season!
Sunday, December 25, 2011

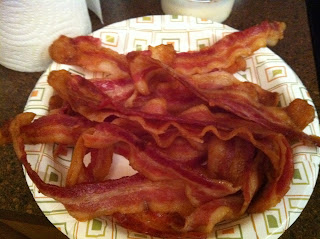
Technique of the week: How-To Make Perfect Bacon

Breakfast dinners, also known as “brinners”, are a fantastic way to use up leftover potatoes, eggs, and those little end pieces and scraps of cheese. In our home, breakfast dinner is usually some sort of scrambled eggs with cheese and onions (I ALWAYS have leftover onion scraps that I need to use up!), skillet potatoes, and bacon.

Mmm, bacon! It’s salty, it’s savory, it’s the perfect complement to most meals, especially the fabled brinner.

Initially, I began cooking bacon on the stove top, in a skillet. This led to more burns on my arms than I’d ever had working the popcorn machine at the movie theater. Bacon in a skillet is hard to keep from overlapping, and therefore you end up with many pieces burned, or worse, under-cooked.

Later on, I learned that bacon on an electric griddle works well, in a pinch. However, due to the lack of convection, you have to turn it half-way through and hope you that you or the bacon doesn’t get burned.

Finally after some research (a combination of internet queries and calling my cooking mentor aka my mother) I learned that the most uniform and crispy bacon is cooked in an oven! Seriously, the best solutions are always the most simple (and the laziest!) This technique is as simple as setting your kitchen timer.

Perfect Oven-Cooked Bacon


You will need:

1 lb bacon

1-2 foil-lined cookie sheets (for easy clean-up!)

Convection oven

DO NOT PRE-HEAT YOUR OVEN!

1. Arrange bacon strips in a single layer on foil-lined cookie sheets. (Use multiple cookie sheets if you need them-the trick is not to overlap the strips.)

2. Place cookie sheets in a cold oven, then crank the heat up to 400 degrees.

3. Walk away. I’m serious. Just walk away.

4. Let bake until crispy, about 20 minutes. Be sure to check on it around 15 minutes to insure it hasn’t begun to burn!

5. Allow bacon to cool, then pat off excess grease with paper towels.

6. Enjoy!

Questions? Comment below!

XOXO,

Shauna E!

Quick and dirty Q & A:

Q. Why shouldn’t I pre-heat my oven? Won’t the bacon undercook?

A. Slow-roasting the bacon is the trick here. A cold oven insures the bacon has enough time to cook through and crisp up without shocking it initially with too much heat (which will cause burning and chewy spots!)

Q. What kind of bacon is best to use?

A. I usually just buy whatever is on sale, but it is important to look at make sure there is a good meat-to-fat ratio on your selection. Some brands I tend to like are Smithfield, and Hormel.

This technique has been tested with pork bacon only, but one could presumably use it just as well with turkey bacon however I would recommend keeping a closer eye on the bacon to prevent burning, as turkey bacon has much less fat and will dry out faster!

Q. A pound of bacon is 16 slices, which is too many for me to eat in one setting. What can I do?

A. You have two options here. For one, you could use only half or a few slices of the bacon in the oven, then (tightly) wrap the package back up and pop it in your freezer to be used up at a later date. Be sure to use a smaller baking sheet and pay closer attention to the time to prevent overcooking.

The other option is to cook the entire pound at once, but slightly undercook it by a few minutes. Let the bacon cool completely, then freeze what you won’t use immediately and to de-frost, pop in a microwave for 30 seconds or until crispy.

Sunday, December 4, 2011

Shauna E's Easy Eats!


Welcome to Shauna E's Easy Eats, the blog dedicated to helping new home cooks create simple, delicious meals on a shoe-string budget. Here you will find step-by-step recipes, tips and techniques and all sorts of savings!

Who is Shauna E?


I'm Shauna, formerly the author of the blog, The College Gastronome. After moving out of my parent's home and gaining some weight, I've gone back to the values of home cooking my parents instilled in my childhood. You can read that inaugural post here.

My recipes are geared towards home cooks with little experience in the kitchen, but all are welcome. Recipes are in a step-by-step format, usually with pictures and always followed by a quick-and-dirty, question-and-answer session to dissect any complicated ingredients or techniques the reader may have.

If you're still confused or unfamiliar with something in a recipe, you can always feel free to comment below!

Questions? Comments? Click below!


Simple, delicious, done!

Shauna E :)


Sunday, August 21, 2011

Peaches Part Deux

Last night I attempted to make my very first chowder. We had lobster meat from Land and Sea that was just begging to be paired with white wine, potatoes, corn, and a creamy, thick broth. My only experience with chowder as a kid was heating my father's can of Campbell's condensed clam chowder-- and boy, did it stink!


That being said, the chowder was a disaster. Okay, maybe I'm being overly critical, but it was a far cry from the thick, steamy masterpiece I was envisioning in my head. My fiance was a doll and ate two bowls in an effort to convince me it was a good first try. I was unconvinced.


The star of the night really ended up being the peach-blueberry crisp I threw together while the chowder was simmering. It uses fresh, in-season peaches and blueberries and several items you probably already have in your pantry. Lovely on its own but definitely a 10 when you pair it with vanilla ice cream.


Peach-Blueberry Crisp

Serves 4 (or 2 dessert-hungry people)


2 firm peaches

1 1/2c fresh blueberries

2 tsp candied ginger, grated*


2/3c rolled oats

2/3c white flour

1/4c brown sugar

1 tsp cinnamon

1/4c vegetable oil

1/2c chopped nuts (optional)


(*Candied ginger can be substituted for fresh or dried ginger mixed with a little white sugar)


Preheat oven to 400 degrees.


Slice peaches down the seam and twist. Remove the pit and any pit pieces. Slice peach into 8 slices, or dice if you want a more homogenized crisp.


Mix the blueberries, peaches, and grated candied ginger in a bowl. Coat the bottom of a shallow baking dish with oil or butter spray and arrange into even layers.


In another bowl, mix together the oats, flour, brown sugar, and cinnamon. Add oil and stir to coat. Gently fold in the nuts.


Spread the mixture evenly on top of the fruits and bake at 350 for 15 minutes or until the top is dry and golden brown.


Serve warm with ice cream.


Simple, delicious, done!


What's your favorite dessert?


XOXO, Shauna aka the college gastronome


Quick and Dirty with TCG


1) What the heck is candied ginger?!


Candied ginger is slices of ginger that have been dried and rolled in sugar. The texture is almost like marzipan and it is great to use in many different desserts and drinks. You can find candied ginger in the international foods aisle of your megamart, usually with the Asian spices/noodles. A small box will run you $1.50 for about 1 ounce.


Candied ginger is also great to eat on it's own. Careful though, it's spicy! I like to suck on it sometimes; it aids in easing an upset stomach.


Don't worry if you can't find it! Merely mix dried or fresh ginger with a little white sugar.


2) The grocery store was out of peaches, or it's the off season. What should I do?


This recipe is great with any and all types of fruit. You could substitute plums for the peaches, or raspberries for the blueberries. If you're dead-set on recreating this dessert in it's entirety, simply use frozen peaches and blueberries. Frozen fruits are picked at their peak of ripeness, then quick frozen to maintain their texture. If you do substitute fresh for frozen, be sure to thaw them out first. You can do this by either running the frozen goodies under warm water, or arrange on a plate at room temperature for 1 hour.


Questions? Comment below.


Tuesday, August 16, 2011

Peachy Keen

My fiance is a bit of a picky eater. Oh, I've watched him eat escargot and steak tartar, but put most fruits or veggies in front of him and watch his mouth bolt itself shut!


That being said, my local chain grocery store had the most incredible fuzzy peaches on sale this week. Firm, sweet and ready to eat, I decided to grill them in the hopes of tricking my beloved into putting something healthy in his mouth. Paired with vanilla ice cream or pound cake (we had both), this amazingly simple dessert is the perfect end to any long summer day.


Simply Grilled Peaches

(Serves 2 or 4 depending on serving size)


2 firm-to-touch peaches

1 tsp vegetable oil

1 tablespoon brown sugar


Vanilla ice cream, pound cake, or whipped cream


Preheat a grill, grill-pan, or griddle to 350 or medium.


Carefully halve each peach along the seam and remove any pits inside.

Brush lightly with the oil and lay cut-side down on the hot grill.

Cook for 5 minutes or until the flesh is charred.

Tent the pan with aluminum foil and cook for an additional 2-3 minutes, or until the outside of the peach is warm and soft.

Remove peaches from the grill and lightly sprinkle with brown sugar.

Allow brown sugar to melt into the peaches while you plate the ice cream or other accompaniments.

Enjoy! :)

Yields 1 peach or 1/2 peach per serving.


Simple, delicious, done!


XOXO Shauna, aka the College Gastronome.


Tuesday, March 29, 2011

Rainy Afternoon Beef Stew

It stormed all afternoon today, an odd occurrence for end of March in the Sunshine State. Also, my fiancé is sick and I didn’t feel like messing with a lot of pots and pans to make dinner tonight. Rain makes me feel sluggish, lazy and also makes me crave the comfort foods of my childhood. Therefor, I made a big steamy pot of stew for dinner, and paired it with a lovely loaf of Cuban bread (soft and chewy with a nice crust) and some salted cream butter.

I love making soups and stews because all you really need is one large pot, a knife and a cutting board.

I went to our local meat market and found the most beautiful cuts of stew beef. Stew beef is chunks of the tougher parts of the cow, such as the leg, shoulder, and butt, that become super tender and buttery when you slow cook them. In the supermarket, this cut of meat may also be called chuck, and beef for stew. Most supermarkets will have it already shrink-packaged and cut into bite-sized chunks, but if you are unsure, definitely ask your butcher! And remember: If there's no butcher, don't buy from there!

Rainy Afternoon Beef Stew
Serves 6-8


You will need:
1 to 2 pounds stew beef
Salt and pepper
2 tablespoons flour
1 to 2 cloves garlic, minced
2 tablespoons oil (I used olive but vegetable would be fine as well)
3 cups cold water
1 package Beef Stew seasoning pack (optional)
5 cups vegetables such as mushrooms, celery, carrots, potatoes, and onion, cut into quarters.
-----------
Wash and cut all the vegetables into quarters. Make sure the stew beef is cut into small cubes and not huge chunks.

Heat a large soup pot with the oil.

Salt and pepper the beef, then dredge in the flour. Add the garlic and sauté until soft, about 1 minute. Add the flour-coated beef to the hot pot, and sauté until all sides are brown.

Add the 3 cups of water, and seasoning pack (if using) and stir, paying careful attention to anything sticking to the bottom of the pot.

Bring to a boil, then drop the heat and simmer for 45 minutes to 1 hour (you will add the veggies later).

Add the vegetables, stir and cook for another 45 minutes or until veggies are tender.

Serve with buttered bread or crackers. Leftovers will store refrigerated for 1 week, frozen indefinitely.

Simple, delicious, done!


What is your favorite meal on a rainy day?

XOXO,

Shauna AKA, The College Gastronome


Quick and Dirty Q&A with TCG


Why do I need to dredge the beef in flour? Doesn't that seem like an unnecessary extra step?

Dredging the beef in flour and sauteing it in a little fat (oil) helps to create a mini roux that thickens the stew later when the water is added. Skipping this step would cause you to have more of a brothy soup than a thick, rich stew.

Why should/shouldn't I use a packet of beef stew seasoning?

I am a huge advocate of short cuts that will make things tastier. A beef seasoning packet will add so much extra flavor to your meal. They contain salt, pepper, dried herbs, garlic, beef seasoning and also cornstarch for a little extra thickness. If you want to omit this, the stew will taste just as good but I definitely recommend adding extra salt and pepper, and maybe even a little garlic and onion powder as well.

Questions? Comment below! XOXO