Sunday, October 28, 2012

Ridiculously Easy Recipe: 10-Minute Chorizo Pasta

I  recently discovered my local Italian grocer sells chorizo! 15 varieties to be exact, but they also make their own house version which I picked up at a bargain for under $5.00 a pound.

Chorizo is a slightly spicy smoked pork and paprika sausage that hails from Spain. It's texture is more dry and crumbly than a regular sausage, and the flavor is out of this world. The best part about chorizo is because it is smoked, it's flavors are highly concentrated so less is more. That pound I bought is going to last me a good, long while! I love to use chorizo is sauteed dishes because it's high fat content really helps to season the rest of the ingredients in my recipe without adding a ton of extra oil.

This dish is great over rotini pasta, and can be served as a main meal with garlic knots and a small salad, or even as an appetizer for when you have company. The hit of parmesan at the end is completely optional but I feel the salty tanginess really helps to pull the spicy flavors together for a truly excellent dish. The best part though? This recipe is so easy it takes only around 10 minutes to prepare!  

10-Minute Chorizo Pasta 


Serves 2 (or 1 if you're really hungry)

1 teaspoon olive oil, or about a 10 second spray with your Misto
1/2 small onion (about 1/4 cup), diced
1 clove garlic, minced
1 link chorizo sausage*, about 3 ounces, coarsely chopped
1 small tomato (Roma), chopped
1 cup spinach, stems removed and torn (you could also practice you chiffon skills here too!)
1/4-1/2 cup chicken broth
2 cups cooked rotini pasta tossed with 1 tablespoon butter or butter spray
2 teaspoons Parmesan cheese (optional)

*I'm not positive if chorizo is something people can get all over the country. If you're unable to find it, substitute your favorite cooked sausage and up the oil to 2 teaspoons.


  1. In a medium skillet, heat the oil on medium high and add the onions, garlic, and chorizo. 
  2. Cook for 3 minutes until the onions and garlic are soft.
  3. Add the tomato and spinach and saute another 3 minutes. 
  4. Add chicken broth or stock and let reduce to the point where the mixture is saucy but not soupy, about 3 minutes. 
  5. Serve hot over cooked pasta, and top with fresh parmesan cheese.
Enjoy!

Simple, delicious, done!

XOXO

Shauna E

Questions? Comment below!


Sunday, October 14, 2012

Ridiculously Easy Recipe: Parmesan Sweet Potato Fries

Parmesan Sweet Potato Fries

After a year of deliberating, I finally signed up for a Pinterest account. I hemmed and hawed for a long time, thinking it to be just a cheap knock-off of my beloved Tumblr.

I was wrong.

Aside from the fun "pinning" system, I just feel much more organized using Pinterest to bookmark recipes than my previous method of keeping them in my browser folder. Not to mention, I can access my recipes from my phone instead of having to look up the recipe on my laptop, then either copy the url to my cell, or print it out.

This recipe for sweet potato fries was the very first recipe I pinned, and the very first recipe I used. Like the original author mentions, sweet potato fries are NOT the same as regular french fries. They are delicious, and they are healthier, but they are in no way a perfect substitute to a basket of crispy, golden potato fries. The little bit of cornstarch (I used flour because that's what I had on hand), does ensure a crunchier crust than normal fried sweet potatoes.

I tweaked the original recipe to include this delicious spice mixture of garlic salt, pepper, parsley, and Parmesan cheese. I'm not a big fan of the traditional flavors paired with sweet potatoes (cinnamon sugar being the most popular it seems,) but feel free to substitute whatever toppings you like or even just leave them plain. They're delicious any way you toss 'em.

Sprinkle with handfuls of parmesan, parsley flakes, and spices.
Soak sweet potato slices for 30 minutes up to 8 hours to remove some of their starchiness
This oil may look hot enough, but it's not.
This oil is the perfect temperature to steam the fries inside but crisp them up outside.

Parmesan Sweet Potato Fries 


Makes 2-4 servings

For the fries:
  • 2 large sweet potatoes, peeled
  • Bowl of cool water
  • 1-2 tablespoons flour or cornstarch
  • Vegetable oil, for frying
For the spice mixture:
  • 2 tablespoons parmesan cheese, shredded or powered
  • 1 teaspoon garlic salt 
  • 1 tablespoon dried parsley, or fine dice fresh if that's what you have on hand
  • 1/4 teaspoon black pepper
  1. Very carefully cut your sweet potatoes into fries. The best way to do this is to halve the potatoes, then halve again, then cut into uniform little strips. You want them to be in between shoestring and fast food fry thickness. Soak the "fries" in an ice bath for 30 minutes or up to 8 hours before you're going to use them.
  2. When you're ready to cook, pre-heat your oil on 400 degrees or set a heavy bottomed skillet to medium high. You'll know it's hot enough when a drop of water splatters in the oil.
  3. Drain the potatoes and toss in flour until lightly coated.
  4. Fry in the hot oil* for 7-10 minutes or until golden brown. You may need to do this in batches depending on how big your fryer/pan is, so keep a foil lined piece of aluminum foil in a 250 degree oven to keep the first batches warm. Be careful not to overcrowd.
  5. Once you are finished frying, plate the finished fries on a paper towel lined bowl or plate and sprinkle generously with the herb/spice mixture. 
  6. Serve with ketchup, mayo, or just plain on their own.
*Be careful! Oil burns are not fun at all. Make sure you have a fire extinguisher or a box of baking soda nearby any time you're frying to easily extinguish any accidental grease fires. Additionally, never EVER leave hot oil unattended. 

Questions? Comment below.

Simple, delicious, done!

XOXO
Shauna E!

------------------------------------------------------------------------------------------------

Quick and Dirty Q&A with Shauna E

1. Why do I need to soak the potatoes first?

Soaking the sweet potatoes in water will help draw out some of their natural starchiness, which in turn will help them stick to each other less during frying. Less sticking equals a crispier fry!

2. Deep frying is do fatty! What are my other options?

It's no secret, the more fat you cook with something, the tastier it will become. While I do believe everything is great in moderation, there are ways to lighten this recipe up. For lighter fries, simply preheat your oven to 450, then spread the floured fries onto a foil-lined baking sheet (for easier clean-up) and drizzle the fries with 2-4 tablespoons of olive oil and smoosh around with your hands. Bake for 12-15 minutes, flipping once and adding more oil. Please note that oven-baked fries will NOT look as crispy as the fries pictured above but they will still be delicious.

3. How can I make sure my fries come out as crispy as when I go to a restaurant?

First of all, make sure you have PLENTY OF OIL. Make sure there is enough oil to cover the potatoes, and then some. For a 10" skillet, I used approximately 2 cups, and even added a little more with the second batch. Second, make sure your oil is HOT!!! See the two pictures precluding the recipe for some examples of how your oil should and shouldn't look when you're cooking. Additionally, attempt not to overcrowd the skillet/fryer. Adding too much at one time will lower the temperature and cause sticking. Remember: The less stickiness  the more crispiness. And always, NEVER EVER leave anything you're deep frying unattended, and always have a method to extinguish nearby just in case.


Friday, October 12, 2012

Foodie Friday:Go Go Gadget Edition

Happy Friday readers! I'm writing from my desk at work where we have approximately 14 orders for 7 processors so... yeah. Blog time, woop!

Tomorrow is the big day! Our boy Regi comes home from Ocala and I couldn't be more thrilled. My husband has gone crazy buying the little stinker every toy a puppy could need, and I've been reading up on training and how to be the best pet owner ever.  I've also book marked so many recipes for homemade puppy treats! I can't wait to spoil our little man rotten.

Okay, okay, enough about the pup already! You're here for the food!

Today I want to talk about my 3 favorite gadgets/tools in the kitchen. These items really motivate me to WANT to cook, instead of just getting through it.

1. Misto Gourmet Olive Oil Sprayer, $9.98

Photo courtesy of Amazon.com


The Misto is an oil spritzer. Instead of using those PAM sprays that are full of propane and who knows what else, you fill the reservoir of the Misto with your favorite oil (olive for me!), pump the lid a few times, and viola! Homemade non-stick spray with natural ingredients. The design is unobtrusive enough to sit out on the counter without looking gaudy. I use my Misto on the grill, sautee pan, when baking, and even to top my salads.

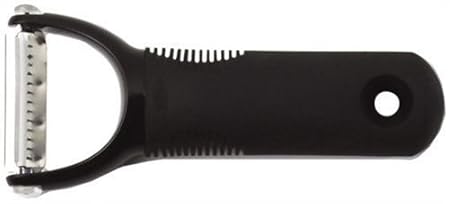
2. OXO Good Grips Julienne Peeler, $9.99

Photo courtesy of Amazon.com


I always assumed people made those gorgeous squash pastas and matchstick veggies using careful knife techniques, or a mandolin slicer that costs $2727437247. I was wrong though; all I needed was a sweet julienne peeler. My best friend Katie got me one as part of my birthday gift this year, and boy am I ever grateful. The very first thing I made with my julienne peeler was fresh zucchini pasta. This is a tool that takes some practice though! You have to have patience and slice the peeler slowly over the surface you're cutting, while also assuming a firm grip. You also have to be very aware of hand placement, or you'll surely loose some skin! The time and practice pay off though the first time you have a beautiful bowl of thin carrots for coleslaw or to top salads.

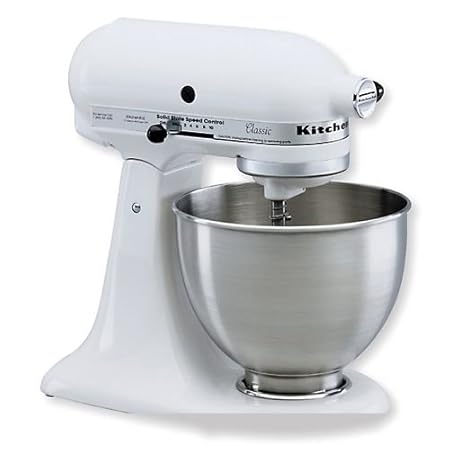
3. KitchenAid Stand Mixer, $258.99

Photo courtesy of Amazon.com

Hands down, the BEST kitchen gadget I have or will ever have. The stand mixer does it all- mixes, kneads, mashes, separates  and so much more. There are literally 50 attachments you can add to this mixer to make it even more kick-ass such as an ice cream maker, slice and dice, or pasta maker. I received this mixer from my parents the year I got into baking (had to do something instead of homework, right?) and it's been my  BFF ever since. Initially my mixer was just for making mashed potatoes, and mixing cake batter, but recently I've learned it can do so much more. It will knead dough, it will separate cream into butter, or whipped cream. Yes, it's a lot of money. However, it's an investment. With proper care, you'll never have to replace it, and it will literally last 30 years or longer. I highly recommend making the investment!


Well kids, that's all I've got. Three amazing kitchen gadgets that make my life in the kitchen a little easier, and more fun. I hope you all have a fantastic week, and stay tuned for Sunday's post!


Wednesday, October 10, 2012

Ridiculously Easy Recipe: Barbecue Chicken Pizza

Almost a month and no updates? I am truly awful. Between my best friend's wedding, getting sick, an impromptu visit from my pregnant sister-in-law, my sister getting a new dog (Oskar is too cute!), AND preparing for our own fur baby, I have been overwhelmed! Despite all that though, I've been cooking up a STORM.

I turned a little bit of Walter (my sourdough starter) into the most amazing, melt-in-your-mouth biscuits. I made shrimp scampi, mushroom risotto, and carrot, ginger, and rosemary soup all for the first time that were amazing.

In the interest of honesty, I also made the worst biscuit gravy ever recently. I decided to use buttermilk instead of 2% and it was vile. Too sour, too salty, not even close to the thick, creamy sauce I was dreaming about. My husband was kind enough to rave about the nasty dish, but I know the truth.

One thing I've made lately that I have LOVED and will make over and over again is this barbecue chicken pizza.  It's no secret I'm not the biggest fan of tomato sauce OR pizza. When the choices for take-out are presented to me, I'll always choose Chinese, tacos, or a sandwich over the famous Italian pie.

This pizza is different though--it combines tangy barbecue sauce with cooked chicken, creamy cheeses, and sweet red onions. A touch of cilantro at the end brings this pizza from home-chef to professional elegance, and really balances out the sweetness of the other ingredients.  This pizza is a great weeknight meal with a salad, or double the ingredients and make two (or 10!) to serve on game day.


Barbecue Chicken Pizza 

Tastes just like the one you can order from California Pizza Kitchen, but without the huge price tag!
Makes 1 pie

You will need:

  • 1 cup cooked chicken breast, chopped, shredded, or cut into strips
  • 2 cups mozzarella, or fontina cheese (or mix the two!)
  • Your favorite bottled barbecue sauce (I like Sweet Baby Ray's brand sweet vidalia onion bbq sauce)
  • 1/2 cup red onion, sliced thin (or more if you're an onion freak like Jeff and I)
  • 1/4 cup fresh cilantro, torn 
  • 1 pizza crust, either store bought or homemade*

*If your local grocery store has a bakery, chances are it puts out fresh pizza dough to buy. If you can't find it, or don't want to make your own, brands like Bertolli and Pillsbury make their own crusts. Make sure you follow the package directions before continuing with the assembly.

Pre-heat oven to 450. Generously flour your work space, then roll out the dough to your desired thickness/pan size. (I prefer to buy those disposable foil pizza pans but if you don't want to do this, either "free-style" your pizza or roll it to fit a standard 13x9 baking sheet.) Using a fork, poke holes liberally through the crust.

With a pastry brush or spatula, spread a thin layer of barbecue sauce on the crust, about 1/4 cup. Alternate sprinkling on the cheese and chicken until the pie is covered. You want some of the chicken to be under the cheese. Sprinkle on the red onion.

Bake for 15-20 minutes until the cheese is bubbling and the visible crust is golden brown.

Remove from the oven and sprinkle on the cilantro. Drizzle on additional barbecue sauce if desired. Allow to cool 10 minutes (if you can wait that long!), then cut into 8 equal-sized pieces.

Simple, delicious, done!

Shauna E!

Questions? Comment below!