Showing posts with label quick. Show all posts

Sunday, September 9, 2012

Technique of the Week: Outstanding Homemade Oatmeal Packs

It's obviously no secret that the more processed and convenient a food is, the more money it will cost. Diced celery will always cost a bucket-full more than it's stalk counterparts. Dried beans, while being more expensive per unit, will always be a better value than the canned stuff because of the amount of servings one bag holds. The cost of ingredients needed to make popcorn at home are still less than the bagged, microwave ready stuff. I could go on for hours, trust me...

Possibly the worst offender is pre-packaged oatmeal. These little envelops are chock full of calories, unnecessary additives for "freshness" and grossly overpriced. 10 tiny little packs for almost $5.00? You have to eat 3 of them to feel full! No way!

I learned awhile ago (total "duh" moment on my end!) that it's easier to just buy the tub of quick oats and make my own flavored oatmeal concoctions. A container of oats has about 30 servings and will run you around $2.50. Throw in some brown sugar, a bag of nuts, and some dried fruit and you're up to a little over $7.00 for three times as much oatmeal as the boxed stuff. The best part? YOU can control exactly how much sugar, sodium, and preservatives go into each pack, therefor making it loads healthier. Give it a try!

Pre-Portioned Oatmeal Packs


Makes 5 individual servings

You will need:

  • 5 sandwich or snack size zipper bags, or other small containers. 
  • 2.5 cups quick-cooking oats
  • 1/4 cup s dried fruit (I used cherry-infused cranberries)
  • 1/4 cup crushed nuts (I had macadamia nuts on hand but almonds, walnuts or pecans would be great)
  • 1/4 cup brown sugar 
  • Cinnamon, to taste
  1. In a medium bowl combine all ingredients, making sure the brown sugar breaks up and is distributed evenly with the oats. Portion into small containers, about a heaping 2/3 cup per serving. 
  2. When you're ready to eat pour the contents of the bag into a bowl, and add 1 cup of water. 
  3. Microwave in 20-second intervals until the water is absorbed, about 1 minute total. 
  4. Enjoy!
A few tips: The ratio of mix-ins to oats is perfectly optional. I know most people would probably enjoy much more sugar in their oatmeal, but I don't have big sweet tooth in the mornings so for me, less is more. If you don't like nuts, skip them! The one important thing to account for is the water. Making sure you double the amount of water to oats is crucial in having oatmeal that isn't too dry. 

If you want to save on the bags/containers, you can also just store the whole she-bang in a large canister and pull 2/3 cup of the mixture out each time you're ready to eat. I leave these on my desk at work so the more portable, the better!

Simple, delicious, done!

Love,

Shauna E

Wednesday, September 5, 2012

Ridiculously Easy Recipe: Pesto Pasta Salad


As summer draws to a close for the rest of the country, Florida summer rages on. Today the temperature was 86 degrees and it won’t be getting any cooler for at least another 3 months.

So while the rest of America can begin to embrace boots, jackets, and cocoa weather, we in Florida can enjoy this cool pasta salad (and our bikinis) for a little longer! 

I love, love, love basil pesto. It’s nutty, it’s slightly sweet and it’s perfect with pasta. The best part is you can use it sparingly and still come out ahead with tons of flavor. I prefer to buy my pesto from the store (Bertoli makes a great one!) but feel free to make your own with fresh basil, toasted pine nuts, and olive oil.

Pesto Pasta Salad


Makes approximately 8, ½ cup servings.

  • 2 tablespoons prepared basil pesto (or make your own!)
  • 1 tablespoon olive oil
  • 4 cups cooked bowtie (farfelle) pasta
  • 1 cup cubed, fresh mozzarella
  • 1 cup fresh spinach chiffonade*
  • ½ cup pepperoni slices, cut into quarters
  • Salt, and pepper, to taste

  1. In a large bowl, whisk the pesto and olive oil. 
  2. Add the still warm bowties, and spinach and stir to combine. The heat from the pasta will slightly wilt the spinach. 
  3. Gently fold in the pepperoni and mozzarella. 
  4. Add salt and pepper to taste. 
  5. Serve immediately or chill for 4-24 hours. 
  6. Garnish with a sprinkle of Parmesan cheese,  if desired.

(*to chiffonade, simply roll a handful of spinach leaves tightly then thinly slice into strips. It’s more visually pleasing than torn spinach and you won’t get big hunks of greens in every bite!)

Simple, Delicious, Done!

Love, 
Shauna E


Sunday, September 2, 2012

Ridiculously Easy Recipe: Luscious Sweet Potato Latkes


All through college (and now as part-time on the weekends), I worked at a NY-style deli that specialized in Jewish delicacies such as chopped liver, knishes, challah and rye bread, nova salmon, matzo ball soup, and of course, potato pancakes. Potato latkes are a delicious marriage of shredded potatoes, onion, parsley, and egg formed into a patty and fried in oil. They are wonderful plain, or with a dollop of sour cream and applesauce. I’ve even had customers smother their potato cakes in maple syrup!

These potato latkes I present to you today are with a slight twist on the old classic: I used sweet potatoes. Sweet potatoes are, as the name suggests, slightly sweeter than their white counterparts. They are higher in fiber as well. The sweetness in sweet potatoes isn't sugary like you would expect, but a mild, earthy sweetness that is delicious when complimented with cinnamon, brown sugar, or butter. 

Just in time for Rosh Hashanah, these latkes are a perfect starter to a New Year’s Seder, or a simple side dish with grilled meat. I personally enjoy them with runny eggs at breakfast! No matter how you slice it, these sweet potato latkes are divine.

Shauna’s Sweet Potato Latkes (adapted from www.allrecipes.com )
Makes about 20 small latkes

You will need:

  • 2 sweet potatoes, peeled and grated (about 2 cups)
  • ½ cup sweet yellow onion, grated
  • 1 egg, slightly beaten
  • 1 tablespoon honey
  • 2 tablespoons all purpose flour
  • ½ tsp ground nutmeg
  • 2 tsp ground cinnamon
  • ¼-1/2 cup vegetable oil, for frying


  1. Peel and grate the sweet potatoes and onions. Place a cheesecloth or paper towels over the mixture and squeeze out any excess liquid. Let the potatoes sit to release more liquid, then squeeze again.
  2. Place the potatoes, onion, egg, flour, cinnamon, and nutmeg in a bowl and stir to combine.
  3. Form the mixture into small, 2” patties.
  4. Heat the oil and fry 2-3 minutes until brown, then flip and cook another 2-3 minutes until golden brown.
  5. Place cooked latkes in a warm oven while you continue to fry until the mixture is done.
  6. Serve with a drizzle of honey, and greek yogurt or sour cream for dipping.

 Enjoy!

Questions? Comment Below!

XOXO

Shauna E!

Tuesday, July 24, 2012

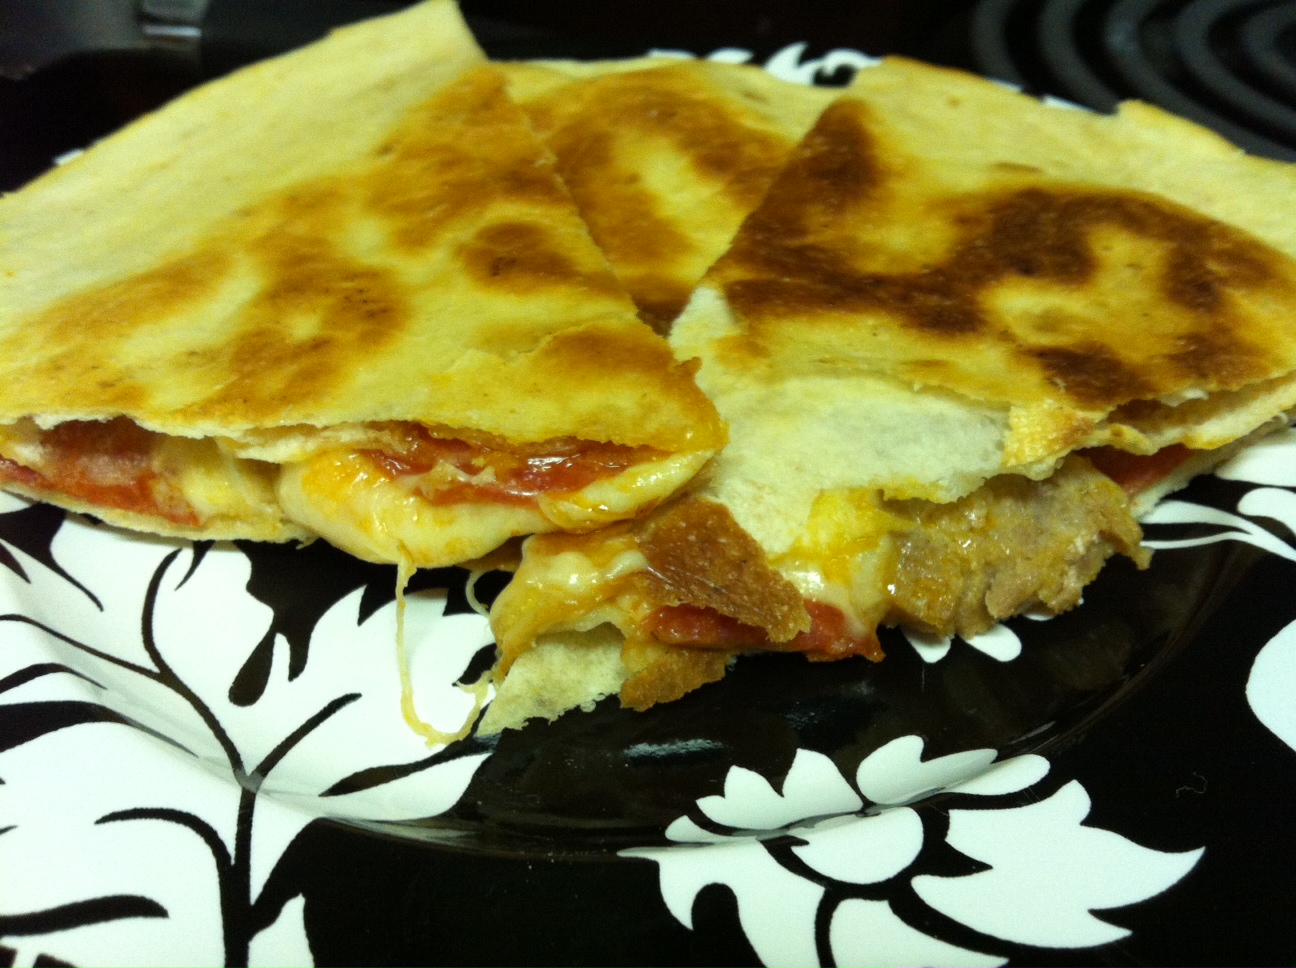
Ridiculously Easy Recipe: Pizzadillas

Has it really been 4 months since my last post? Did you miss me? I've missed you!

There have been lots of big changes in my life since my last post. I switched careers from serving to being a property preservation processor (don't ask me, I don't even know what it means), plus we switched apartments (loving the new place so much more than our last!) and now my husband and I are in the market for our very own furbaby. It's been incredibly hectic around here (more than I enjoy on a normal basis, wahhh) and I am so glad to be back into a normal routine!

As I mentioned, I recently switched jobs. It really doesn't pay any more than serving did, but there has been an added pressure of actually budgeting my money versus spending it as I go. For that reason, I've had to be much more thrifty with our food budget. I buy in bulk, I freeze whatever we won't use right away, and I've been trying much harder not to waste any food scraps that are leftover. A few tablespoons of sauce, some leftover cheese, and the last, abandoned tortillas from taco night are turned into an easy, creative meal that tastes just like a thin and crispy crust pizza. 

I'm actually pretty surprised I never thought to use tortillas like this before. Now I'm curious about other flavor combinations: What would a cubandilla be like? What about a greekdilla? The possibilities are literally endless! This sandwich would be perfect served with a salad as a light meal, or skip the large tortillas and op for minis instead. I'm betting these would make pretty terrific appetizers! 

Shauna E's Pizzadillas

(Sorry for the poor picture; I really need a new camera!)

Makes one pizza quesadilla (Double, or triple as needed!)

You will need:

  • 2 large tortillas (10" size is preferred)
  • Softened butter or butter spray
  • 1/4 cup prepared tomato sauce (plus extra for dipping!)
  • 3/4-1 cup shredded mozzarella cheese, enough to cover one tortilla (I like a lot of cheese)
  • 2 tablespoons grated Parmesan cheese
  • 1/2 tablespoons dried Italian herbs
  • 1/2 tablespoon garlic powder
  • Pepperoni, ham, sausage, sun-dried tomatoes, bell peppers, or any other pizza toppings you like!


The trick with this recipe is to go light on the ingredients: less is more. You don't want to bog down the crust with a lot of weight and lose the crispiness on the outside!


  1. Brush each tortilla lightly with softened butter.
  2. Place one tortilla butter-side down on a preheated skillet or grill.
  3. Quickly smear on a thin layer of tomato sauce, and top with mozzarella cheese.
  4. Layer on any toppings you prefer, remembering to go sparingly with them.
  5. Grill for 2 minutes or until cheese is mostly melted.
  6. Sprinkle on Parmesan cheese, garlic powder and Italian herbs.
  7. Top with a second, buttered tortilla.
  8. Using a spatula, carefully flip the entire thing over and grill until second tortilla is crispy.
  9. Remove first pizzadilla from the heat, cut into halves or quarters. 
  10. Serve with additional warmed tomato sauce.

Questions? Ask below!


XOXO

Shauna E!


Wednesday, January 18, 2012

Ridiculously Easy Recipe: Positively Pop-able Mini Quiches


I have a problem getting up before ten in the morning. I guess it’s leftover from my college days when I strategically picked classes that started at noon, coupled with my love of staying up all night burning my eyeballs on the computer monitor.

My shifts at work normally start at eleven, so very rarely do I get up in time to both get myself ready AND have a healthy breakfast. Breakfast for me is normally a cup of drive-thru Dunkin Donuts ice coffee! But since it is a new year, I’ve been trying hard to cook more and, in turn, eat more breakfast.

These miniature quiches I made today are definitely going to help in my quest for that first meal of the day. Adapted from this quiche recipe from the Egg Beaters website, it combines crisp bacon, creamy mozzarella cheese, and fresh, chopped broccoli for a unique weekday treat or even something worthy of company for a weekend brunch! Pair these with skillet hash browns, or even a small salad or fresh fruit.

I opted to make these in my mini muffin tins and regretted it. While the flavor was there (and if I do say so myself, this flavor combo is DELICIOUS), I felt as if I had to eat 5 or 6 to felt satisfied. I think next time I will definitely make them in my 12-cup instead, or even in a skillet like my sister does!

Mini Crust-Less Bacon, Broccoli and Cheese Quiches

You will need:

1 carton, 16oz, egg substitute (Such as Egg Beaters, I used cheddar and chives flavored)

1/2 cup chopped broccoli

1/2 cup crumbled bacon or 1/4 cup bacon bits (from the jar)

1/2 cup shredded mozzarella cheese

Cooking spray


1. Preheat oven to 350 degrees.

2) Generally grease a 24 or 12-cup muffin tin with cooking spray.

3) Fill each cup 1/3 way with egg substitute.

4) In a bowl, mix cheese, bacon, broccoli and spices together.

5) Add 2 teaspoons of filling to each cup, and gently press in.

6) Bake in a preheated 350 degree oven for 18-20 minutes or until eggs appear puffy and golden brown.

7) Serve immediately or store in the fridge


Simple, Delicious, Done!

XOXO

Shauna E!

Quick and Dirty Q&A

Q. I don't eat meat, or I don't like broccoli. What other fillings could I use?

A. The possibilities for fillings in any quiche are ENDLESS! Substitute broccoli for frozen, chopped spinach (make sure you defrost first!), or even mushrooms, zucchini, or tomatoes. Trade the bacon for ham, smoked turkey, or crumbled sausage. Skip the meat entirely and just use leftover roasted veggies. I just used ingredients I had on hand. For example, I was originally going to use Mexican Four-Cheese blend for the cheese, but found a small amount of mozzarella in the drawer that needed to be used up first.

The trick is to make sure everything is chopped small, and not to overfill the muffin cups!

Q. You say to use what's on hand, but I don't have any Egg Beaters!

A. To make this recipe sans Egg Beaters beat 6 large eggs with about a 1/4 cup of milk. I like the Egg Beaters because they require no work on my end, and they are forever on sale at my Publix. But I will always advocate using what is on hand before running out to the store for just one ingredient!

Questions? Comment below!